Print / PDF product catalog
Setting up templates for printable and PDF catalogs
MyBusinessCatalog provides means for individual configuration of the reports that are created with the program:
- Price List – Price list.
- Paper Catalog – Printed illustrated catalog of products.
- Fist Image viewer – First image printing configuration.
- Second Image viewer – Second image printing configuration.
- Order – Order form configuration.
All the configuration actions are performed in the Report Manager window.
To access this window, start the Catalog in the editing mode
(configurator’s menu item Start Catalog – Editing mode or through the
menu Windows –MyBusinessCatalog – Editing mode).
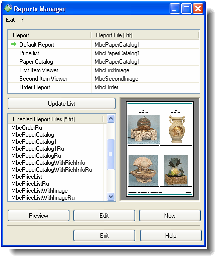
The upper part of the window has list of forms that are used in My
Business Catalog and templates (reports) that correspond with the
forms.
The top form – Default Report – is not used in
MyBusinessCatalog.
The lower left list has reports that are ready to be used in
MyBusinessCatalog.
The right part contains the report preview.
Configuring reports.
The program comes with pre-configured reports and additional forms.
If you are not satisfied with the reports provided with My Business
Catalog, you may edit them according to your needs.
On the upper list, select the report that interests you. In the lower
list you may select the form (style) that the report will be
displayed according to.
To preview the report in the full-screen mode, click on the Preview
button.
To edit selected report, click on the Edit button.
To create new report, click on the New report button. This
opens the template with preset objects. Position those
objects in other places as needed and save the new report under a
different name (using the File – Save as…menu).
If you would like to create a new report based on an existing one, open
the original report for editing, save it under a different name
(using the File – Save as… menu) and then edit it as needed.
When you are done creating the new
report, refresh the list of available forms by clicking on the
Refresh button.
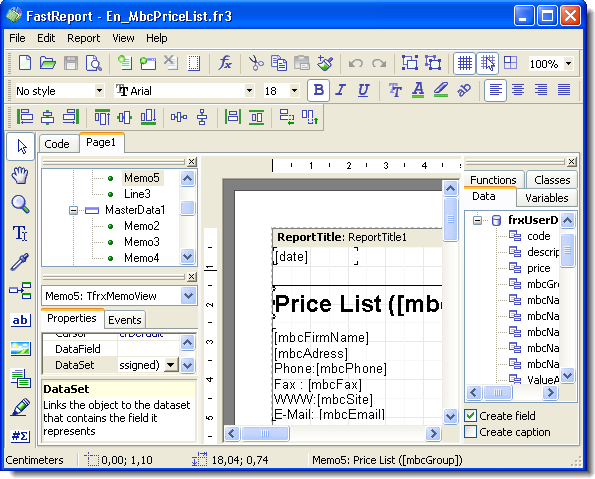
Report designer
The Designer provides means for developing report’s appearance and allows previewing the new report. The Designer’s interface is developed on the up-to-date level and has toolbars that can be customized according to one’s preferences.
You can download the complete manual on working with the Designer at /frgolden.chm
Creating sections
To create new report, add the sectionMaster data to the designer’s workspace and place objects with links to the corresponding data source on that section.To add new section: click on the button
Once the positioning is finished, you will be suggested to select the section type.
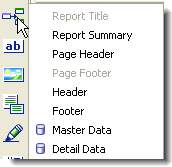
Select Master data and click OK.
When all the above is completed, you may start placing objects to the section you just created.
During report generation, the Master Data objects that you have positioned on
the form will be filled with data for each item on the list.
The Report Title section is displayed only once in the beginning of the report.
For the Master Data section's title you should add either the section Master
Header or the section Page Header. The objects placed in those sections do not
repeat and make a list like record from the products or orders databases do,
but rather appear only once on the top of the list or on the top of each page accordingly.
The sections Master Footer and Page Footer can be used the same way, but
they appear on the bottom of the report or page accordingly.
In general, the sections structure appears as follows:
Report Title
Page Header
Master Header
Master data
Master Footer
Page Footer
Distances that you leave between sections in the Report Designer do not matter.
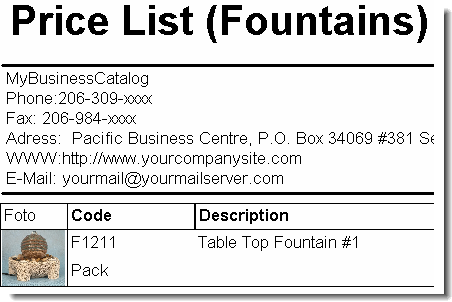
Example:
Let’s place the image object and a few text blocks with variables
on the Master Data section. On the Report Title section, let us place
textbox with text and variables with information on our organization.
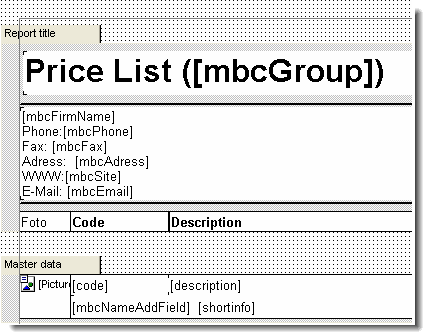
You will get the report:
Positioning objects on section
Reports are generated from objects of 4 types:
«Textbox»
«Image»
«Rich Text»
«Codebar»
To switch to the object management mode, click the
![]() button.
button.
The Textbox object
This object is used for adding text information to the section.
The object appears as a rectangle of user-defined size with multi-line
text inside it. Color/shading, border type, size and color, font
settings, alignment and text orientation can be also configured.
Use the button ![]() to add new textbox. In the window that appears, you may enter the
text that you would like to place on the section. Along with the
text, you can also add special variables
that are filled with actual data in the process of generating the
report. The variables should be placed in the square brackets [].
to add new textbox. In the window that appears, you may enter the
text that you would like to place on the section. Along with the
text, you can also add special variables
that are filled with actual data in the process of generating the
report. The variables should be placed in the square brackets [].
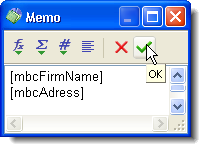
Once you have completed your entry, click on the checkmark button on the toolbar. To open an existing textbox for editing, simply double-click on it.
List of available variables
Variables for displaying information on items (products):
Can be used in all reports being generated.
[code] - product code (ID)
[description] - product name
[price] - product price
[mbcGroup] - current group of item's name
[mbcNameAddField#1] - Addition field 1 name
[mbcNameAddField#2] - Addition field 2 name
[mbcNameAddField#3] - Addition field 3 name
[mbcNameAddField#4] - Addition field 4 name
[mbcNameAddField#5] - [mbcNameAddField#30] - Addition field 5-30 name
[ValueAddField#1] - Additional field 1 value
[ValueAddField#2] - Additional field 2 value
[ValueAddField#3] - Additional field 3 value
[ValueAddField#4] - Additional field 4 value
[ValueAddField#5] - [ValueAddField#30] - Additional field 30 value
[richinfo]
[image1]
[image2]
Variables for displaying information on your organization:
These variables correspond with information, that was entered in the Configurator.
Can be used in all reports being generated.
[mbcFirmName] - organization name
[mbcPhone] - your phone number
[mbcFax] - fax number
[mbcAdress] - address
[mbcEmail] - E-mail
[mbcSite] - web site address
Additional
Can be used in all reports being generated.
[mbcCurrency] - currency name
[mbcDate] - date of last update
[Date] - current date (for the printing moment)
Variables for forming orders:
Information on clients
Used with the order form only.
[orderqty] - quantity
[ordertotal] - total for the item
[mbcFirmNameFrom] - client's organization name
[mbcAdressFrom] - address
[mbcPersonFrom] - contact person
[mbcPostFrom] - title/position
[mbcPhoneFaxFrom] - fax number
[mbcEmailFrom] - E-Mail
[mbcContactFrom] - preferred way of contact
[mbcOrderNote] - memo
The Image object
This object is used for adding graphic information to the section.
Use the button ![]() to add new image.
to add new image.
The object can be used for two purposes: placing static images (e.g. your
organization’s logo) or displaying photos from your catalog.
Adding static images
To add a static image, simply double-click on the image object and
select the image file to be added to the section in the window that
appears.
Setting up a link to an image from within the Catalog
Click on the preset 'Image' object
Jump to the 'Events' inspector tab
In the 'Inspector' window, click on the OnBeforePrint line.
Enter the following code in the 'Code' window that appears:
procedure Picture1OnBeforePrint(Sender: TfrxComponent);
begin
try
if <image1><>'' then picture1.loadfromfile(<image1>)
else picture1.clear;
except
end;
end;
For the second image, respectively:
procedure Picture2OnBeforePrint(Sender: TfrxComponent);
begin
try
if <image2><>'' then picture2.loadfromfile(<image2>)
else picture2.clear;
except
end;
end;
Picture1 and Picture2 - 'Image' object's name. (Any names are allowed; you can change them as you wish).
It also appears in the 'Inspector'window and can be changed
In this object's context menu, you can also select the following options:
«Stretched» - the image will be stretched to the object's boundaries.
«Center picture» - the image will be displayed in the center of the image object.
«Keep aspect ratio» - when the stretch option is selected, the image ratio will be preserved.

The Rich-Edit object
This object is used for adding RTF (Rich Text Format) information to the
section.
The editor allows performing all basic text-editing operations: changing
font, aligning, creating marked lists. The text may also contain
variables.
Use the button ![]() to add the rich-edit object.
to add the rich-edit object.
The object can be used for two purposes: placing static text or
displaying products’ extended descriptions from your catalog.
Adding static texts
Add new Rich-Edit object to the section. Once you are finished with the
object positioning, the text editor window will appear. Use this
window to enter and format your text.
When you are done editing, click on the Save button
![]()
Adding links to descriptions from the Catalog
Click on the preset 'RichEdit' object
Jump to the 'Events' inspector tab
In the 'Inspector' window, click on the OnBeforePrint line.
Enter the following code in the 'Code' window that appears:
procedure Rich1OnBeforePrint(Sender: TfrxComponent);
begin
try
Rich1.RichEdit.Lines. LoadFromFile(<richinfo>);
TfrxRichView(Sender). RichEdit.Font.Size :=15;//Font size ex: 15;
TfrxRichView(Sender). RichEdit.SelectAll (TfrxRichView(Sender).RichEdit.Font);
except
end;
end;
Rich1 is the object name, which is also displayed in the Inspector window and can be edited.
DO NOT USE the square brackets [ and ] in the description texts!
Codebar
Configuration is similar to one for the previous objects.
Double-clicking on a selected object will open the barcode editor to configure the
barcode type and properties.
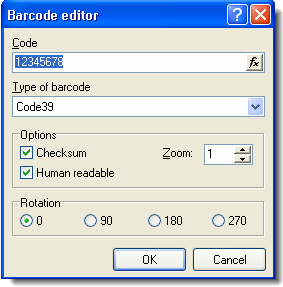
Current version supports 23 kinds of bar code types, including
2 of 5 interleaved
Code39
Code39 Extended
Code128A-C
Code93
Code93 Extended
MSI
PostNet
Codebar
EAN8
EAN13
EAN128A-C
UPC A, E0, E1, Supp2, Supp5
In the 'Code' field in the example '12345678', the corresponding value will be substituted from the database during generation of the report.
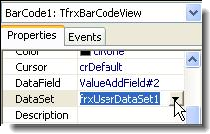
In the example below, the barcode will be generated upon the data from the 2nd additional field.
In the 'Inspector' window, click on the OnBeforePrint line.
procedure BarCode1OnBeforePrint(Sender: TfrxComponent);
begin
BarCode1.text:=[ValueAddField#2];
end;
or select DataSet and DataField In the 'Inspector' window
Tips on generating reports.
Variables that can be used in the order forms only are ignored when used in other reports.
The report will have only the first or second image - the one that you selected while
adding the image object to the data section. The program does not allow placing
both of the images at once.
If appearance of both the first and second images should be the same in the report,
select for both First Item Viewer and Second Item Viewer the same template form
from the list at the bottom.
Note. For better quality of printing charts and diagrams, you are recommended to stretch
the sectionand the image object to the editor's entire workspace and rather not use
the Stretch mode.
You can also create multi-column reports.
Examples:
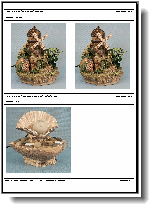
One-column catalog. Displays two images, name and price of each item. Holds two items on each page.
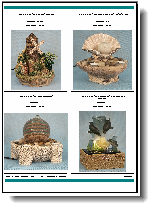
Two-column catalog. Displays one image, name and price of the item. Holds four items on each page.
To modify the number of columns to be displayed in report, select the section Master Data.
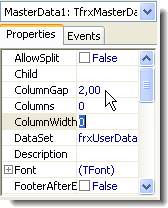
Using the object inspector, you can modify the number of columns (Columns), column width (ColumnWidth) and the gap between the columns (ColumnGap).