In the current version of the program, you can either use one of the
three start-up welcome options or disable the splash screen
completely.
At the “Welcome” tab’s top toolbar, use the drop-down
list to select the welcome screen display mode:
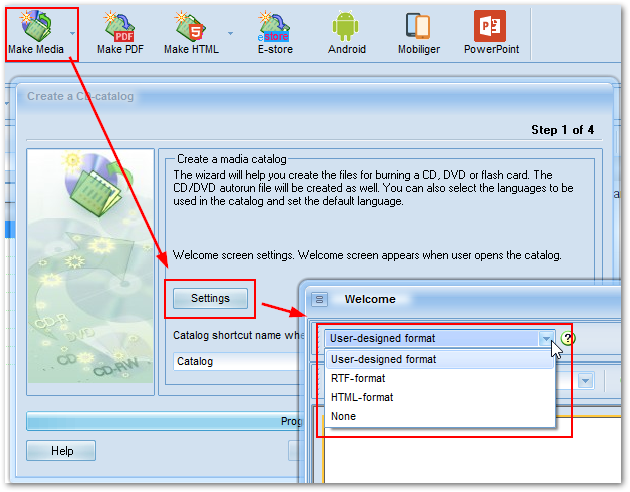
User-designed format
RTF-format
HTML-format
None - disable welcome screen
The authors of the program recommend using this format for creating a welcome screen.
The program provides a built-in editor for working with this display mode.
Save changes before leaving the editor. The screen will be refreshed automatically.
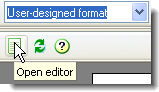
To edit the welcome screen, click on the «Open editor» button on the toolbar.
The major tools (left toolbar by default) used for creating / editing welcome screen are as follows:
![]() «Text» object
«Text» object
![]() «Image» object
«Image» object
![]() «RichText» object
«RichText» object
To switch to the object control mode, use the
![]() button.
button.
Text object
This object is used for placing text information on a section.
It appears as a rectangular with multi-line text inside. Color /
shading, border type, border width and color, font properties, text
alignment and angle can be adjusted.
To add a text field, use the ![]() button. In the window that appears, you can enter your text.
button. In the window that appears, you can enter your text.
Once completed entering text, click on the checkmark button. To open a
text object for editing, simply click on it with the mouse.
Use the editor’s toolbar to make necessary changes to text
properties; you can specify or modify the size, font, alignment, etc.
Use floating tips to navigate through the toolbar.
Image objec
This object is designed for adding graphic information (logo, decoration
items, etc.) to a page.
To add an image object, click on the
![]() button and specify the image / photograph location.
button and specify the image / photograph location.
Image setup
To add a static image, simply double-click on the selected picture and
select the image file on your disk in the window that appears.
On this object’s context menu (right-click to open), you can
specify the following options:
«Stretched» - The image will be stretched to fit the object boundaries.
«Center picture» - The image will appear in the center of the object.
«Keep ratio» - If the'stretch' option is selected, the image ratio will be preserved.
«RichEdit» object
Designed for inserting the RTF (Rich Text Format) text.
The editor allows carrying out all the basic manipulations over the text; change font, set alignment, create bulleted lists.
To add an RTF field, use the
![]() button.
button.
Once the object is set, the text editor window will appear; there you can
enter or edit your text.
When you are done with your text, click on the “Save” button
(![]() ).
).
RTF-format
RTF-format is left to preserve compatibility with the earlier versions.
Creating a page in this format requires minimum of computer-related experience.
When this mode is selected, the following toolbar will appear to
let you format the text being entered or the entire document's background.
The editor toolbar is common for any text editor.
When creating / editing of the page is complete, do not forget to
save it (click the very first button at the left.)
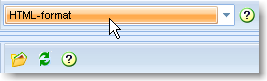
HTML-format
This kind of welcome page is useful when you have a corporate web site available.
You have got all the HTML features at your disposal. Click on the '\data\html\index.html'file; the corresponding folder will appear.
The directory file is index.html. All additional files (images, CSS, scripts) are to be stored in the '\data\html\' folder.
To open the folder where you should place the files, click on the button «Open folder with files».
When creating a distributive or Internet updates, the nested
folders are ignored. Therefore, when uploading updates to the Internet
you should keep in mind that you are uploading the entire contents of the '\data\html\' folder.
None
Use this if you have no need to set up a welcome page or you have got no time or skills to develop one.
When this option is selected, the Catalog will open without a welcome
page, on the "Catalog of Goods" tab. See the figures below:
When any kind of welcome page (except for 'None') is selected:
When the None mode is selected: