Before importing data, you should determine whether you are going to use, and how you will name the auxiliary fields. (In other words, determine where we are going to import the data to.) More on this issue can be found here.
The application features extensive capabilities for importing your data automatically from an existing price list of a multitude of formats. You shouldn't be afraid of the seeming difficulty of the process, for our goal is to explain to the application clearly which data we are going to give to it and in which format we would like to obtain the result. Follow the wizard's instructions and this documentation, and the result will be excellent!
To open the import wizard, click on the 'Import' button on the main toolbar:
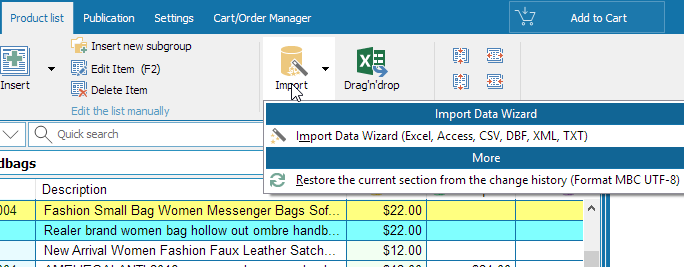
That will open the first window of the wizard that will help you import your
data to the digital catalog.
(Import from XML, format MBC - imports data from a custom MyBusinessCatalog
format, used for technical purposes; Import from Gold - imports data from
the older generation of MyBusinessCatalog.
In this case, our interest is on the Import Wizard
The import wizard offers three options.
On this step, you are supposed to specify an approximate structure of the data
you are about to import.
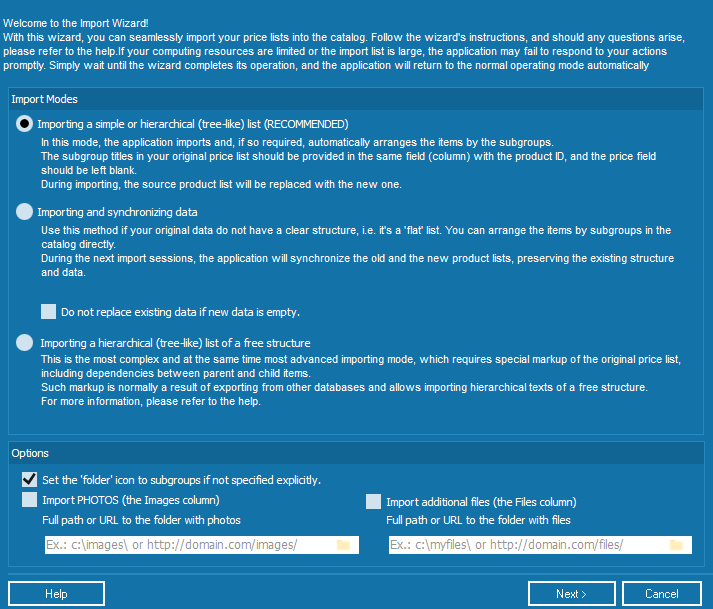
Importing a plain or hierarchical list
This option is perfect for importing Excel files, including those with subgroups.
Let's take a look at a typical example.
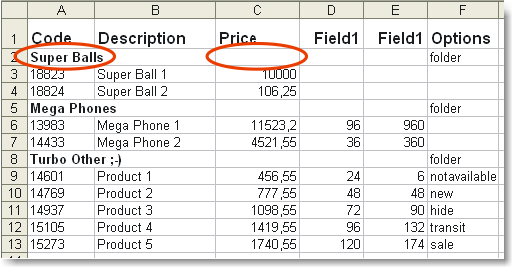
As we can see on the figure, in order to enable the application distinguish subgroups from product items, we have entered the subgroup names in the column with the product ID and left the price value in that record empty.
But this is just the way we normally form price lists in Excel!
If you have it a bit different, you would need to adjust it just a little bit. A bit more complex structure is described below.
Please don't forget to close the source file prior to importing; otherwise you will get the 'Resource busy!' error.
Click on the 'Next' button.
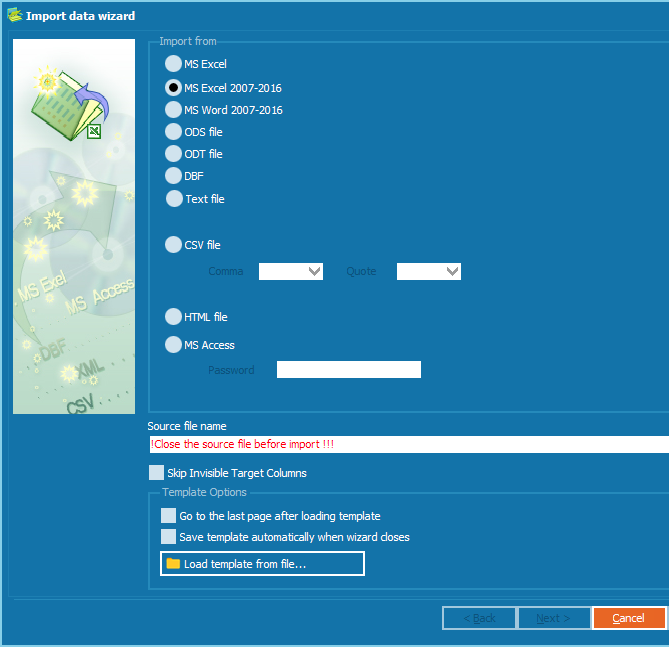
On the 'Import from' list, select MS Excel (in this case) and then select your
file in the 'Surce file' field.
(More on using templates is described below.)
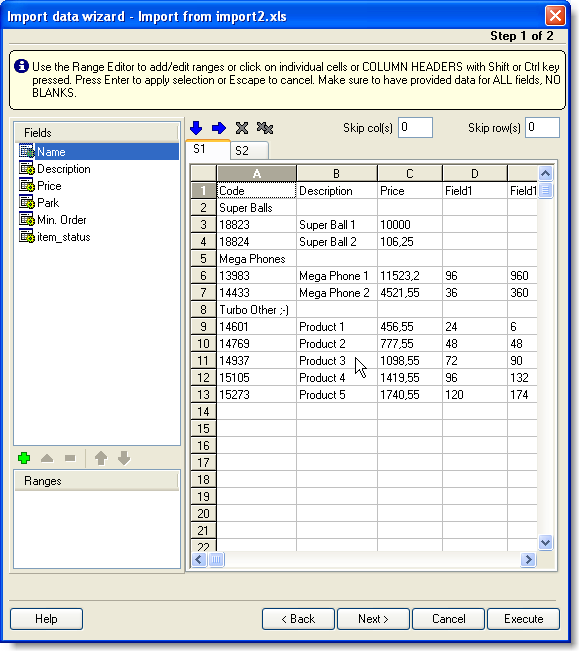
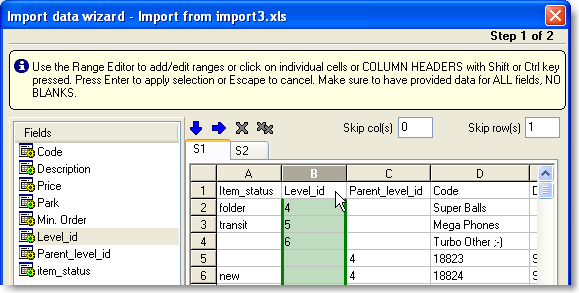
This is the window where we will define which columns in your file will
correspond with the fields of the digital catalog.
As you can see, the application has loaded your file to the import wizard (no
import whatsoever has taken place so far,
the data is loaded and waiting for further instructions on getting the data to
the digital catalog). On the first side, you can see a list of fields (columns)
in the digital catalog you are about to create.
Specify which column in your file does correspond with which field in the
catalog. On the left, select the field (for example, Code), on the right -
holding the Ctrl key pressed - click on the header of the 'A' column. The column
will be highlighted with a different color.
Press Enter to store the result. Repeat this for each field of the digital
catalog you are creating, NO SKIPPING.
(Customizing fields in the digital catalog.)
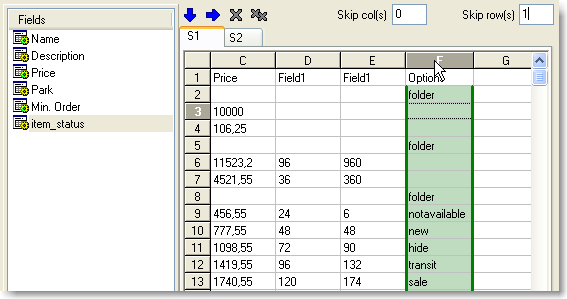
On the list of catalog fields, you can see a special field, Item_status.
It is purposed for specifying the column with the list of icons for the item. In
our example, we have created the Options column for that purpose. This is not
a mandatory field. Don't strive to fill it unless you really need it.
Also, if the option 'Automatically set 'folder' icon to subgroups if not
specified explicitly' is enabled on the FIRST page of the wizard,
the folder's icon will be set automatically, without extra efforts on your side.
Possible values
folder
notavailable
hide
new
transit
sale
bestseller
action
none
Please take a note of the 'Skip row(s)' box to which we have entered 1. That means that the wizard should skip 1 row of the 'header' of the source document (In other words, we are not going to import the first row with column headers - Code, Description, Price, etc. - to the catalog. The same way, we are going to exclude from the import our company's contact information and other "alien" records at the top of the source document.)
So, the data in our file is bound to the fields of the catalog. Click on the 'Execute' button.
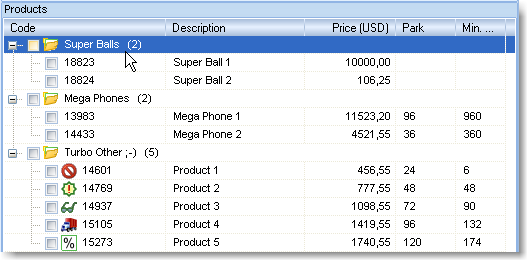
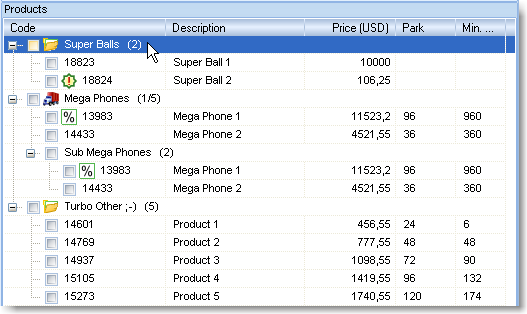
As you may see now, the structure of the list has been reconstructed completely. The icons have been arranged as it had been specified.
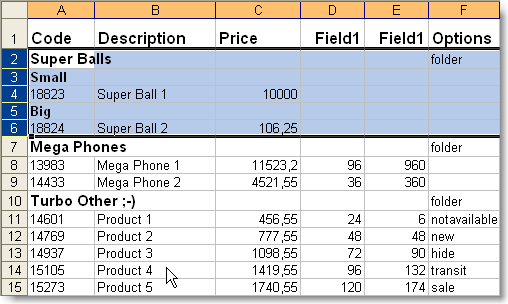
What can you do if the structure of your price list is a bit more complex?
By this example, we can see that the Super Balls subgroup also contains two
subgroups, Small and Big.
Here is the result we would have obtained after running the import:
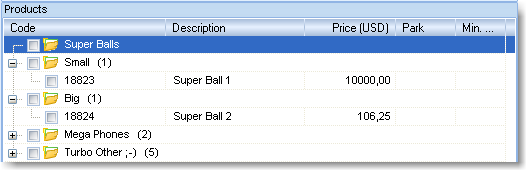
The Super Balls group has remained out of the game, all by itself.
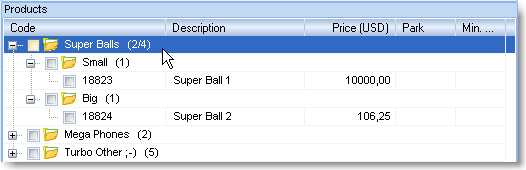
Holding the Ctrl key pressed, click on the Small and Big subgroups and drag them
to Super Balls!!!
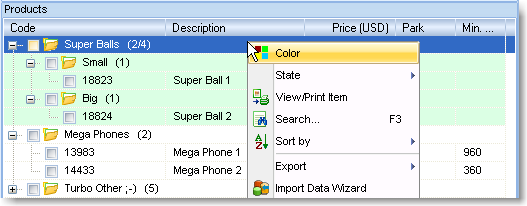
For the final touch, let's highlight the group with a different color! (Use the
context menu - right-click on it with the mouse.)
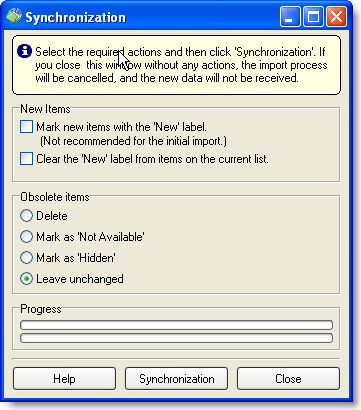
Importing with synchronizing data
This import method is purposed for importing a non-structured 'plain' list. Next, you would add subgroups and drag imported product items to them by hand.
When importing again, the catalog structure created manually will be preserved. The existing data will be updated, new data will be added to the end of the list. On the final step of the importing, the application will open a window with additional settings.
More on the synchronization window.
The imported data selection process is similar to the previous description of the import. The Item_status field is intentionally absent this time, as we are going to import non-structured data.
Do not replace existing data if new data is empty.
This option is very useful. The idea is that if you have a working finalized list of products, you can import data of just one column from an external source of data (for example, you have a separate list of correspondence between product codes and their photograph files or you want to load product dimensions from an external database).
When importing, you can specify just the product code column (MANDATORY) and the missing columns. (Create a catalog - About SKU)
In this case, the program will not interpret the missing columns as your decision to clear the data (i.e. will not clear the name field or others), but rather carefully append just the missing columns.
Importing a hierarchical (tree-like) list of a free structure
The trick about this import method is that the source document is to have a clear structure. There are two additional fields that are mandatory.
Document markup example. The lines indicate dependencies between parent and child items.
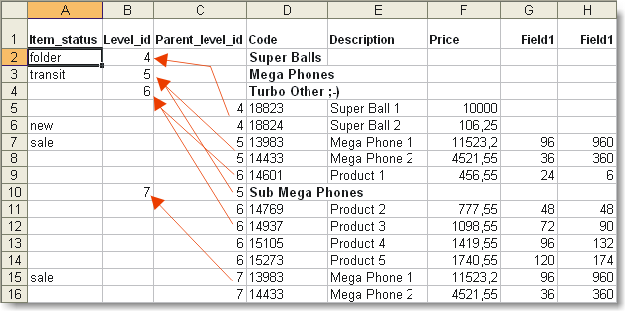
Select the corresponding fields from your document for the special fields Level_id and Parent_level_id.
The list will be split into group automatically during importing.
Additional special fields
Along with importing products, you can import images and additional files.
Image files and additional files can be located either on a local or network drive or swapped over http://
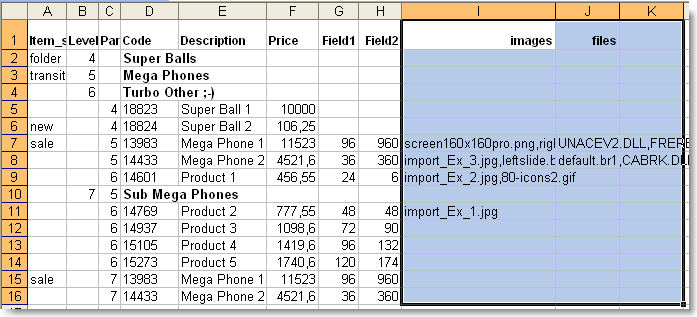
On the first step of the import process, enter the folder or Url of the files to be imported. In other words, if on your list of products to be imported the file names have the format anyfile.ext, and the files are located in the folder c:\images\ this is the location to be entered. The file c:\images\anyfile.ext will be added to the catalog automatically. See the figure.
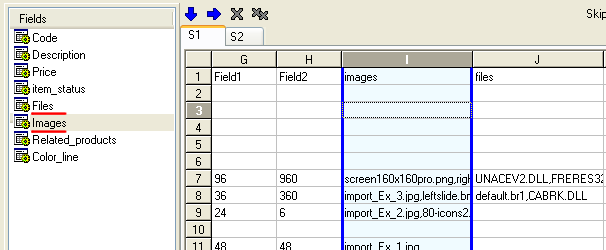
Import of this kind is possible on the condition that your file you are going to import from has a column with the list of images (two at the most; the rest will be ignored) and (or) list of additional files (descriptions, instructions, charts, etc.)
To import images automatically, the column with the image file names is to be specified in the special field Images. Acceptable formats: jpg, gif, bmp, and png. The program automatically converts them to its working format (JPG).
The same is true to user's files. The format of the files does not matter. The column with the list of files is to be specified in the Files field.
Example of source file
Example of settings in the import wizard
Note: Please keep in mind that the files are copied to the catalog folders and are not modified when the original files are modified. A file is not added if it was added earlier.
Notes and explanations
First, select the format of the source file: MS Excel, MS Access, DBF, TXT or CSV. If you are importing data from a CSV file, you would also have to define the character that would separate the columns and the character to be used as the right and left quote in the table.
In the Source file field, enter the name of the file you are going to retrieve the data from.
Load Template – use this button for loading an import process setup from an existing template file (source file, options, formats, etc.) Please note that field columns in a template are stored by their name; therefore, please keep in mind that renaming them may cause the existing template to run incorrectly.
Click on the 'Next>' button to move to the first step.
(If you have selected MS Access)
First, select the data source - an MS Access table or an SQL query. If you choose to import from a table, please select the table from the list; if you want to run a query, please enter it in the box at the bottom; for example:
SELECT * FROM COUNTRY WHERE CONTINENT='South America'.
Click on the 'Next>' button to move to the next step.
Setting up correspondence
On this step, you should set up correspondence between the data fields of the source table and your fields, which you are going to import the data to.
MS Excel
First, on the list to the left select the field (for example, ID) and, while holding the Shift or Ctrl key pressed, click on the corresponding column or string header.
You can also select a free range of cells, columns and rows by selecting them with the mouse while holding the Shift and Ctrl keys pressed.
To confirm the choice you have made, press >Enter.
Repeat this routine for each field (name, price and all of your additional fields.)
If you would like to skip a few topmost rows (for example, the header on an EXCEL page) or leftmost columns (numeration in the price list), please specify the numbers in the 'Skip ... rows' and 'Skip ... columns’ fields.
Auto-fill by Column – use this button to automatically set correspondence between your data fields and of the table to be imported. In this case, the ID field will correspond with the first column, the Name field - with the second one, etc.
Auto-fill by Row – same as previous but in relation to rows.
MSAccess
In the right and left tables, select the fields corresponding with one another and then click on the Add button Repeat this for all fields in the right table.
To drop an existing field link, click on the Delete button.
Auto-fill - use this button to automatically set correspondence between your data fileds and of the table to be imported. In this case, the ID field will correspond with the first column, the Name field - with the second one, etc.
DBF
In the right and left tables, select the fields corresponding with one another and then click on the Add button Repeat this for all fields in the right table.
To drop an existing field link, click on the Delete button.
Auto-fill - use this button to automatically set correspondence between your data fileds and of the table to be imported. In this case, the ID field will correspond with the first column, the Name field - with the second one, etc.
TXT
Select a field (e.g., ID) on the list to the left. In the field to the right, set two vertical lines, limiting data for this field in the table being imported. Double-click to add or delete a separator. To change the field width, drag the separator while holding the left mouse button pressed.
When the separators are properly set, click between the separators to assign the selected range to the current data field.
If you want to skip a few rows at the top, set the number of rows to be skipped in the 'Skip ... rows' field.
CSV
If you have properly set CSV table separators on the previous step, on the right side you should now see a table split into columns according to your settings. If you do not see it, please return to the previous step.
Select a field (e.g., ID) on the list to the left and click between the separators corresponding with your data.
Repeat that for all fields.
If you want to skip a few rows at the top, set the number of rows to be skipped in the 'Skip ... rows' field.
Auto-fill - use this button to automatically set correspondence between your data fileds and of the table to be imported. In this case, the ID field will correspond with the first column, the Name field - with the second one, etc.
Click on the 'Next>' button to continue or click 'Back' to return to the previous step.
Show confirmation – show notification of completion.
Show confirmation after ... records – set the number of records, after which the notification is to be shown.
Records to be imported
All records – import all records.
Only first… - if you do not want to import all records, you can specify the required numer. The wizard will retrieve the requested number of records beginning with the first one.
Identity of product items is determined by the key field. For the key field, the wizard uses Code.
Make sure to have specify a key column. (by default - Code. Recommended.)
The application will compare the retrieved data right by this field.
Save Template - use this button to save the import settings (source file name, format options, etc.) to a file to be able to use it for configuring your next import.